You may have seen this imposing building during your travels in the Great Haseley area of Oxfordshire. Sadly, it has fallen into neglect and the years have taken their toll. A major restoration project is now underway, aiming to return this historic building to its former glory. Follow the progress of the restoration in our blog....


The Restoration Team

Thursday 20 December 2012

Fan staging

With the continuing wet/dismal/cold weather, we have moved indoors to start work on the staging for the fan. The purpose of the fan is to keep the cap pointing into wind, so that the sails are properly aligned. Old photographs show the design of the staging, which supported the fan and its associated gearing. We are relying on this evidence, along with a drawing of the mill from the 70s, as there were no physical remains when we started the restoration.

The whole staging will rely on two sturdy beams (the fan 'booms') which will locate in the tail beam of the cap. These then project out of the rear of the cap. We are making the fan booms, and the associated staging, as a separate 'unit' indoors. As with the cap, this will then be taken down and rebuilt on site, prior to the whole lot being lifted on by crane.

Initial laying out of fan booms and joists


Joists housed into the booms, and uprights added, with bracing
The 'axle' for the fan will sit across the top of the two uprights. It is a large fan, 12 feet in diameter; in keeping with such a large cap. We are in the early stages of making this - we may need a bigger workshop!

Sadly, some of the gearing parts which linked the fan to the cap have disappeared over the course of time. So, we have also been welding/fabricating, as well as pattern making for casting of replacement parts.

There will be no more blog posts for a little while, so have a good festive break and check back with us in the New Year for further news!......


Wednesday 14 November 2012

How do you raise a cap?

With difficulty! There should be a word for fitting rafters to to make a windmill cap roof..... Well, if it's good enough for barns, it's good enough for windmills; so I'll call it raising. Anyway, that is the stage we reached today. We have trial fitted the ribs in place, using a temporary pattern instead of the actual finial (we'll leave that challenge until we assemble the cap for real on-site). This was a tricky procedure, especially for the first few ribs, but the more we added, the easier it became. By the end of the day, we had all the tenoned ribs in place - that leaves us with the tapered ones to fit in-between.

Wow, it's starting to look like a windmill
Other items from the previous few days:

The braces for the truck wheels have been finished and fitted;

Two of the four new truck wheel braces

and we have made a start on the storm hatch and neck block

Starting the storm hatch; the weather studs fitted to the weather beam

The old neck block (supports the bearing for the windshaft), doesn't look too bad from this angle


From beneath, doesn't look quite so good!
Starting to make a new neck block

Thursday 8 November 2012

Sunshine, and some more framing

Hoorah, dry weather. With the basic cap frame set up and lowered back onto the cap circle, attention has now turned to the additional frame members. The two diagonal braces between the weather beam and shears had somehow escaped the decay which affected the other beams, so we have reused these and fitted them into place. We have also reused the central block between these two braces, and made two new 'closers' which fill the gaps either side of this.

Diagonal braces fitted

Presumably, these braces originally helped spread the load from the weather beam to the cap circle, as well as stiffening the frame to resist thrust from the sails.

The cap is kept in position laterally by cast iron 'truck wheels' which rotate against the inside of the curb. Four of these were hung off diagonal struts running between the outside of the shears and the cap circle. We are having to remake these, as the originals had, you guessed it, decayed.

Making one of the new truck wheel supports (shown here upside down); lapped dovetail will fit into cap circle

Wednesday 7 November 2012

Cap framing in the rain


Having chosen to build the cap outside, we are having to work in (brief) windows of fine weather. The sprattle and tail beam are now morticed in, so the basic cap frame is together.


The sprattle and tail beam in place


Closer view; with wedging space on the sprattle

Oh, it's raining again. What a change.


At least we've got the hang of arranging the tarpaulin now, so we don't have an olympic sized swimming pool to drain off every morning.

Sunday 4 November 2012

Heavy cap timbers

As promised, a further update on the cap construction....

Having taken delivery of some rather hefty sections of oak, we are now in a position to start building up the main cap structure. First up, the two large beams which run front to back in the cap, the 'shears'. Here we see one of the shears in position, being cleaned up prior to being notched over the cap circle. Large timbers call for large planes!

Shear being cleaned up

With both shears cleaned up and notched into place, next came the transverse beams. The next photo is looking from the front of the cap towards the rear. So, we have, from front to back, the weather beam, sprattle beam and tail beam.


The weather beam and tail beam will support the front and rear ends, respectively, of the windshaft. The sprattle beam is effectively in the centre of the mill and will locate and support the top end of the main upright shaft.

The next two shots show some detail of how these beams are located in the shears.

Dovetail joint between weather beam and shear

Tenons at ends of weather beam and sprattle
The tenons on the sprattle (upside down in this shot) are cut to allow for wedging of the beam into position. This gives some scope for adjustment, so the upright shaft can run true. In contrast, the tail beam will be a direct fit. So, next job, morticing..........

Monday 29 October 2012

An update on Cap progress

The scaffolding has gone, the temporary cap is still there, despite the weather, and we have retreated to the relative comfort of our workshop. After a brief hiatus, we have progressed with work on the reconstruction of the cap, so here is an update.

Much of the timber in the cap was too far 'gone' to be reused. However, some of the ribs have been brought back to life, with splice repairs.

The first task was to build the foundation of the cap; the 'cap circle'. This was made in a similar fashion to the curb, with curved oak segments butted together and joined with recessed metal plates. This was built upside down, to allow us to fit the metal track on which the cast-iron wheels (trolley wheels) will run as the cap rotates.  Many of the original sections of track were reused. However, a few new pieces had to be made to match, as some of the originals had been excessively distorted as the decaying cap had sagged. These were not flimsy pieces of metal, so this hints at the total weight involved.

Joint of cap circle segments, with track also shown
The whole cap circle, upside down at this stage


Next, we made a smaller version of the cap circle, which will hold the trolley wheels. These were made of elm, which should cope with the large cutouts. Again, the segments were joined with ironmongery.

Bearing cages overlaid on cap circle
Once we were happy with this set-up, the cages were removed and the cap circle segments were turned over the right way, to allow us to start fitting the ribs. These were morticed individually, hopefully at the right angle so everything will come together at the top. Each rib comprises a lower and upper part, joined together to give a reverse ogee curve. The top end of the ribs fit into a rather cramped arrangement at the finial, with every other rib morticed in, and the others fitting in-between.

A lower rib section, with splice repair, morticed into the cap circle
The lower part of the finial, morticed ready to receive the ribs

Getting up to date, we have now moved onto fitting the main timbers of the cap structure. More of this to follow in my next blog entry, coming soon......


Friday 1 June 2012

A temporary cap

Now that the curb is finished, we have been building a temporary roof for the tower. This will keep the weather out, allowing the scaffold to be taken down. We will then move on to the rebuild, off-site, of the cap.

Starting to board out the roof. Excuse the soulless OSB, it is only temporary!

Boarding finished, and felt going on.

The finished roof, with chicken wire under the eaves, to keep the birds out and still allow ventilation.

Thursday 24 May 2012

Curb complete!


Over the last few days we have been finishing off the curb and fixing it into position. Here are a few photos showing the developments..... 
 

The curb, with metal track let-in. This acts as a 'ball-race' for the rollers which will allow the cap to rotate into wind. The large nut just inside the track is for one of the holding down bolts. Inboard is the guide ring, which, er, guides, the cap as it rotates around the curb.
 

Under the curb, showing a holding down bolt concreted into the masonry. The curb is temporarily propped up, to be lowered later, sliding down these bolts. This method allowed us to tighten the various bolts/nuts holding the curb and guide ring sections together, prior to these being 'lost' under the curb when it was lowered.

Ready to be lowered

Lowering on three chain hoists simultaneously, onto a bed of mortar. Note the lack of overalls due to working in the 'greenhouse' section of the scaffold, in 25 degrees heat.

Level and position checked, the curb in its final (we hope!) position.

Tuesday 15 May 2012

Guide ring pieces


We have started to make sections for the guide ring, which will be fixed to the curb. Our new portable bandsaw is proving to be very useful for tasks such as this, we don't envy the original millwrights cutting by hand. Once planed and cleaned up, the sections should (will!) fit together as per the curb last week.

Thursday 10 May 2012

The curb begins to take shape

So, the nine sections for the new curb have been cut and pre-drilled for their holding down bolts. After checking the layout on the ground, the sections were then hoisted to the top of the mill and laid into place. Thankfully, everything lines up (never in doubt!) The next job will be routering a channel for the sections of metal ring which will be sunk into the curb, providing a 'track' on which the cap can rotate.

Hoisting, a time consuming two-stage process for each section

The first few sections going into place

The complete ring


Thursday 19 April 2012

Windows with a view, and more masonry.....


Finally, we have finished the re-pointing of the tower! The next masonry task is rebuilding the top of the tower, to give a firm bed for the curb. The original outer and inner 'skins' of the tower are in fairly good condition, but the loose infill appeared to have been carried on right to the top. Consequently, when the rotten curb was removed, quite a few stones fell away with it!.


Using a template arm, pivoting around the top of the main upright shaft, the loose stonework is repaired to the correct level. The oak curb sections will then sit on a bed of mortar, to give a bit of leeway for final levelling. The originals were held down with coach screws, driven into timber blocks which had been set into the tower as it was built. A hole for such a block can be seen above, just in front of the template. We are proposing to fix studs into concrete poured into these holes, as retrospective fitting of timber, with an acceptable degree of security, is impractical.


It has also been good to see the new sash windows going in; it makes such a difference to the feel of the building. They have already been tested for weather-resistance, courtesy of the extremely heavy showers this week. We always get a good view of the incoming weather from the top of the tower !....

Tuesday 6 March 2012

An update on progress.....

So, the New Year's Resolution to keep more up to date on the blog hasn't quite panned out! Anyway, with the recent cold weather making masonry work impractical (frozen lime mortar doesn't work very well), we have shifted our attention to the cap.

'First-aid' repairs in the '70s did a good job of preserving what was left of the cap. However, the deteriorated condition of the timber means that much of it will have to be replaced, using the originals as evidence of how the cap was constructed. In fact, the cap turns out to be quite a confusing mixture of original material, old repairs, more recent repairs and some mystery items (repaired repairs?!)

So began the process of stripping the cap, recording the evidence as we went, prior to sorting through what can be re-used.


At this stage, the aluminium cladding and felt have been removed, together with some of the ribs, here propped against the curb.

This is looking down on the front of the cap, with all the ribs removed. The weatherbeam is rotten, as are the front ends of the shears.


A section of the curb, showing its generally poor condition (rot and worm).


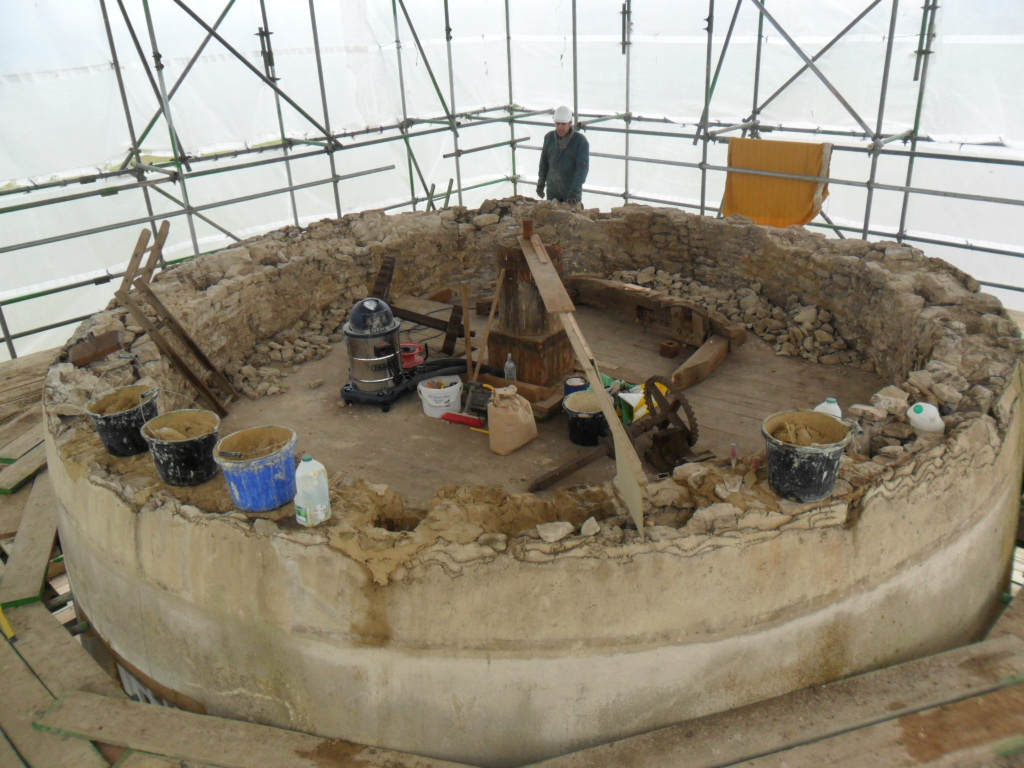
And finally, with everything removed! This picture doesn't quite convey the mass of items which were lowered to the ground: aluminium sheeting, ribs, weatherbeam, shears, brake arm, winding gear, truck wheels, centering wheels and a lot of ironwork.

We have also been making replacement sash windows:

Evidence from remaining parts show the original windows were sash but with no weights, presumably wedged open as required. So, that is what we have made. Once fitted, they will be a great improvement over the chicken-wire / Tyvek combination currently in their place!