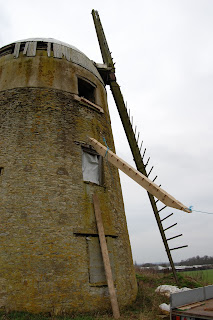
You may have seen this imposing building during your travels in the Great Haseley area of Oxfordshire. Sadly, it has fallen into neglect and the years have taken their toll. A major restoration project is now underway, aiming to return this historic building to its former glory. Follow the progress of the restoration in our blog....
The Restoration Team
The Restoration Team
Thursday, 22 December 2011
All wrapped up for Christmas
The mill is now slightly more conspicuous, with a full scaffold and roof. This will help with the continuing repointing and replacement of the outermost lintel sections. Further down the line, the protection of the scaffold will be crucial when work starts on the cap.
With our first proper close-up look at the upper section of the tower, it is apparent that the masonry on the south side has suffered quite badly from frost. Presumably, this type of damage prompted the rendering of the upper part of the tower, but we hope not to resort to that!
Meanwhile, during the bad weather, we have been in the workshop repairing the wallower and making replacement sash windows. There has also been some repair work for us at nearby Wheatley windmill, so, all in all, a busy end to the year.
Merry Christmas, and see you in 2012.
Thursday, 8 September 2011
Unearthing evidence
The ground at the base of the tower has needed lowering for some time. A banking of soil, with nettles and even an elder tree, had somehow accumulated. To assist with working on the exterior masonry, this ground has been dug/raked back to a more appropriate level. This revealed a nice threshold at the eastern door, made from one half of a millstone, complete with outer band!
Tuesday, 6 September 2011
Cement and centipedes
After the last post, we have been continuing with the replacement of rotten lintels on the inside of the mill. These are now complete, leaving the outermost member of each lintel to be dealt with in the future, pending scaffolding.
Recently, we have turned our attention to exterior masonry. Where to begin?! The original lime mortar, in places, has crumbled quite badly. This appears to have been repointed on at least three occasions. Once, and presumably some time ago, with lime mortar of a more coarse texture. Secondly, with a brown/grey cement, and lastly with an almost black cement. The latter is most prevalent around the base of the tower, seemingly in an effort to weatherproof this region of damaged stone.
Unfortunately, cement does not breathe as lime mortar does, and so any water which gets in, tends to be trapped. This is quite clear when chasing out the cement: it is covered with lichen and the original mortar behind it is dark in colour, crumbly and damp, with centipedes, woodlice and even worms living in the cracks. Ironically, the original, un-repointed lime is in a much better state, with no lichen or beasties.
The effect of trapped moisture is also shown by frost damage to much of the stone which had been smeared over with cement.
So begins a labour of love...chasing out the cement and loose mortar, before repointing with lime and, where necessary, filling in stone where the frost damage is at its worst. Give us a day or two (cough!....)
Recently, we have turned our attention to exterior masonry. Where to begin?! The original lime mortar, in places, has crumbled quite badly. This appears to have been repointed on at least three occasions. Once, and presumably some time ago, with lime mortar of a more coarse texture. Secondly, with a brown/grey cement, and lastly with an almost black cement. The latter is most prevalent around the base of the tower, seemingly in an effort to weatherproof this region of damaged stone.
 |
| Showing original mortar and patches of flaky grey/brown cement, covered with lichen |
Unfortunately, cement does not breathe as lime mortar does, and so any water which gets in, tends to be trapped. This is quite clear when chasing out the cement: it is covered with lichen and the original mortar behind it is dark in colour, crumbly and damp, with centipedes, woodlice and even worms living in the cracks. Ironically, the original, un-repointed lime is in a much better state, with no lichen or beasties.
The effect of trapped moisture is also shown by frost damage to much of the stone which had been smeared over with cement.
So begins a labour of love...chasing out the cement and loose mortar, before repointing with lime and, where necessary, filling in stone where the frost damage is at its worst. Give us a day or two (cough!....)
 |
| After chasing out, the stonework is more defined. |
Thursday, 21 July 2011
Lots of things being finished at the moment....
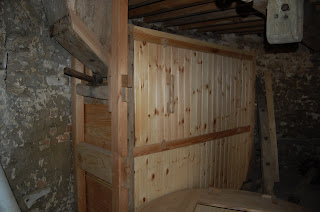
The newly-refurbished boulter on the stone floor is looking splendid, seen here with the cover on...
and with the cover off.
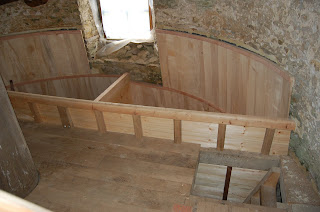
Also looking good is the bin floor; the sycamore panelling has been trimmed neatly with douglas fir strips, and capping strips added to the bin dividers. Consider the 'i's dotted and the 't's well and truly crossed. One day I'll buy a fish eye lens to show these views properly!
Up on the dust floor, the very poorly wallower has been removed from the main shaft, for major reconstructive surgery back at the workshop. This freed up some room around the shaft, so the last area of flooring could be joisted and decked out. My knees will never be the same again! The 'hole' in the floor is to allow the sack hoist drum to bear against the underside of the wallower, thus giving a friction drive. Much of the mechanism for the sack hoist was absent, so we are extrapolating from what we have seen on the stone floor (where there are similar mechanisms to drive the boulter).
Unfortunately, over the years, water seems to have found its way into the main shaft, probably where it was seeping through the rotten wallower. So, there is a rot pocket in the main shaft which will need repairing. We need a very solid structure here, against which we can wedge the wallower in place.
And finally, the curved stairs to the dust floor are finished, complete with handrail. Luxury, compared to a tied-on ladder.
Yet more lintel repairs
The lintels above the south doorway, on the stone floor, were in dire need of replacement. Here, the middle and outermost pieces have been removed, these were badly affected by rot / worm. The innermost piece was relatively unscathed, so we are keeping this, with the help of a bit of preservative.
The replacement middle lintel in situ.
The original and replacement outer lintels. Note the 'slight' decay of the original - good job they were over-engineered to start with.
About to lift up the outer lintel prior to installation. Next job - masonry repairs. Deja vu ! Still, at least we're out in the open for this one - cue bad weather.......
Saturday, 9 July 2011
Boulter, the next stage.....
Quite some time ago, the remains of the boulter were repaired, and new panels constructed around them. Now, we have a clear area on the stone floor in which the refurbished boulter can be installed. With some tweaking to account for a dished floor and sagging feed hopper, the cabinet was in!
Working from the remains of the original boulter and floor, the layout of the internal hoppers could be deduced. This gave three outlets, for the fine flour, coarse flour and bran respectively. This photo shows new elm panels being fitted, to recreate the original hoppers. At the top of the photo, the original feed hopper can be seen. The drive to the boulter cylinder passes through the cabinet just beneath this.
And finally, a view from beneath the stone floor, showing the newly cut outlets; fine to coarse from right to left.
The next task is to reinstate the drive mechanism for the boulter. Yet more things on which to bang our heads. The ideal stature for a miller must have been about 4ft 6in.
Wednesday, 8 June 2011
And now, it's time for the gallery.....
The gallery rails have now been restored/repaired, and new floorboards fitted.
Beneath the gallery, rebated panels both box-in the main shaft and act as grain bin dividers. Some of the original boards were saved, although, sadly, many were so wormy that they were beyond help. We have had to be careful with clearance around the main shaft, as it shows some eccentricity when turned. This could be due to distortion of the shaft or inaccuracies in the shaping of its flats.
The original timbers around the bin floor walls showed evidence of fixings for cladding, presumably to protect the grain from damp. We have started reinstating this cladding with sycamore. The individual boards are tapered slightly to account for the inward lean of the walls; coopering on a grand scale! Unfortunately, the stonework is 'slightly' irregular (sorry masons) so the inward lean is continually varying. Makes for a challenge.
Thursday, 12 May 2011
More masonry work and cogging the crown wheel
The North bin floor window has suffered in the same way as it's southern counterpart - invasion by tree roots causing the mortar to crumble. The retained moisture has also caused frost damage to some of the stones. This picture shows the stonework cleared back, to give a reasonably sound starting point for repairs.
As a mental break from the never-ending stones and lime mortar, some recogging of the crown wheel. Good for another hundred years!......
Thursday, 5 May 2011
NEWS UPDATE. Mill is open on Sunday 15th May
As part of National Mills Weekend, we will be opening the mill to visitors on Sunday 15th May from 11am until 5pm. Please do come and have a look.
In terms of access, your best bet is to park in Great Haseley, if coming by car, then approach the mill via Back Way and then the footpath/track which leads directly to the mill.
Please be aware that as this is still a 'live' project, the site may not be suitable for the very young or infirm. Unfortunately, there are no facilities at the mill, but hey, that's all part of the charm!......
Putting in the good bits....
They have been waiting in storage for some time, but the two sets of stone furniture were finally installed today. New tuns, horses, hoppers and shoes. Hang on, it looks like a mill suddenly.
Also coming out of storage today was the repaired staircase, leading from the ground floor to the stone floor.
Fortunately, it fits!.. Phew.
 |
| Stone floor with new stone furniture added |
 |
| Closer view of North stone furniture |
 |
| North stone furniture showing tun, horse, hopper and shoe |
Also coming out of storage today was the repaired staircase, leading from the ground floor to the stone floor.
Fortunately, it fits!.. Phew.
 |
| Repaired staircase being fitted |
Wednesday, 4 May 2011
No posts for a while, but we have been busy
Note to self - must remember to bring camera to mill....
Anyway, the weeks have gone by and progress has been made on masonry repairs, boarding out the dust floor and removing the brake wheel for repair.
Anyway, the weeks have gone by and progress has been made on masonry repairs, boarding out the dust floor and removing the brake wheel for repair.
 |
| Dust floor under construction, seen from below. The weather has resulted in the boards shrinking slightly, even though the timber was kiln dried! Can we have some rain please. |
 |
| Windshaft, with brake wheel and brake removed. |
 |
| The windshaft bearing has 'sunk' into the supporting beam. We recently carried out a repair on the exact same problem at Lacey Green windmill. |
 |
| Trimming the dust floor for the staircase |
 |
| Remember our nice clear chimney in the winter? Persistent devils, these rooks. |
Thursday, 3 March 2011
Beam me up Scotty
No posting on here for a while, but we have been busy!
The top, or 'dust', floor was totally absent, so new beams and joists have been made at the workshop. Lifting of the large beams into the mill was originally going to be carried out with a crane. However, soft ground and access problems led to a decision to manually hoist the beams through the northern bin floor window. Cue strong, cold northerly wind !.....
The ends of the beams were pre-cut into splice joints. With the splice ends removed, this gave a short enough length of beam to manoeuver inside the tower.
Much re-hitching and shuffling later....the beams and splices were finally in place.
Next job will be to fit the joists into the housings which have already been cut.
Prior to this, we have also been fitting replacement lintels to both bin floor windows. This has involved a lot of masonry work, making good the stonework above the rotten lintels - much of which had fallen out.
 |
| North beam and splice in position prior to final fixing |
Subscribe to:
Posts (Atom)


