You may have seen this imposing building during your travels in the Great Haseley area of Oxfordshire. Sadly, it has fallen into neglect and the years have taken their toll. A major restoration project is now underway, aiming to return this historic building to its former glory. Follow the progress of the restoration in our blog....


The Restoration Team

Tuesday, 15 May 2012

Guide ring pieces


We have started to make sections for the guide ring, which will be fixed to the curb. Our new portable bandsaw is proving to be very useful for tasks such as this, we don't envy the original millwrights cutting by hand. Once planed and cleaned up, the sections should (will!) fit together as per the curb last week.

Thursday, 10 May 2012

The curb begins to take shape

So, the nine sections for the new curb have been cut and pre-drilled for their holding down bolts. After checking the layout on the ground, the sections were then hoisted to the top of the mill and laid into place. Thankfully, everything lines up (never in doubt!) The next job will be routering a channel for the sections of metal ring which will be sunk into the curb, providing a 'track' on which the cap can rotate.

Hoisting, a time consuming two-stage process for each section

The first few sections going into place

The complete ring


Thursday, 19 April 2012

Windows with a view, and more masonry.....


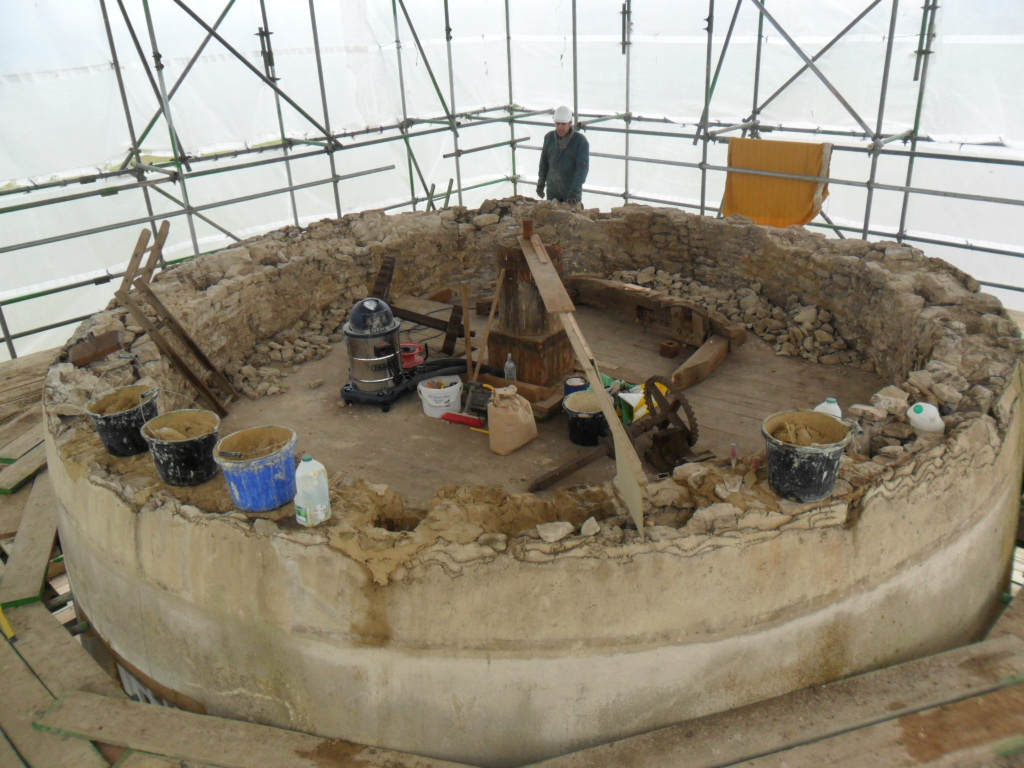
Finally, we have finished the re-pointing of the tower! The next masonry task is rebuilding the top of the tower, to give a firm bed for the curb. The original outer and inner 'skins' of the tower are in fairly good condition, but the loose infill appeared to have been carried on right to the top. Consequently, when the rotten curb was removed, quite a few stones fell away with it!.


Using a template arm, pivoting around the top of the main upright shaft, the loose stonework is repaired to the correct level. The oak curb sections will then sit on a bed of mortar, to give a bit of leeway for final levelling. The originals were held down with coach screws, driven into timber blocks which had been set into the tower as it was built. A hole for such a block can be seen above, just in front of the template. We are proposing to fix studs into concrete poured into these holes, as retrospective fitting of timber, with an acceptable degree of security, is impractical.


It has also been good to see the new sash windows going in; it makes such a difference to the feel of the building. They have already been tested for weather-resistance, courtesy of the extremely heavy showers this week. We always get a good view of the incoming weather from the top of the tower !....

Tuesday, 6 March 2012

An update on progress.....

So, the New Year's Resolution to keep more up to date on the blog hasn't quite panned out! Anyway, with the recent cold weather making masonry work impractical (frozen lime mortar doesn't work very well), we have shifted our attention to the cap.

'First-aid' repairs in the '70s did a good job of preserving what was left of the cap. However, the deteriorated condition of the timber means that much of it will have to be replaced, using the originals as evidence of how the cap was constructed. In fact, the cap turns out to be quite a confusing mixture of original material, old repairs, more recent repairs and some mystery items (repaired repairs?!)

So began the process of stripping the cap, recording the evidence as we went, prior to sorting through what can be re-used.


At this stage, the aluminium cladding and felt have been removed, together with some of the ribs, here propped against the curb.

This is looking down on the front of the cap, with all the ribs removed. The weatherbeam is rotten, as are the front ends of the shears.


A section of the curb, showing its generally poor condition (rot and worm).


And finally, with everything removed! This picture doesn't quite convey the mass of items which were lowered to the ground: aluminium sheeting, ribs, weatherbeam, shears, brake arm, winding gear, truck wheels, centering wheels and a lot of ironwork.

We have also been making replacement sash windows:

Evidence from remaining parts show the original windows were sash but with no weights, presumably wedged open as required. So, that is what we have made. Once fitted, they will be a great improvement over the chicken-wire / Tyvek combination currently in their place!

Thursday, 22 December 2011

All wrapped up for Christmas


The mill is now slightly more conspicuous, with a full scaffold and roof. This will help with the continuing repointing and replacement of the outermost lintel sections. Further down the line, the protection of the scaffold will be crucial when work starts on the cap.

With our first proper close-up look at the upper section of the tower, it is apparent that the masonry on the south side has suffered quite badly from frost. Presumably, this type of damage prompted the rendering of the upper part of the tower, but we hope not to resort to that!

Meanwhile, during the bad weather, we have been in the workshop repairing the wallower and making replacement sash windows. There has also been some repair work for us at nearby Wheatley windmill, so, all in all, a busy end to the year.

Merry Christmas, and see you in 2012.

Thursday, 8 September 2011

Unearthing evidence

The ground at the base of the tower has needed lowering for some time. A banking of soil, with nettles and even an elder tree, had somehow accumulated. To assist with working on the exterior masonry, this ground has been dug/raked back to a more appropriate level. This revealed a nice threshold at the eastern door, made from one half of a millstone, complete with outer band!

Tuesday, 6 September 2011

Cement and centipedes

After the last post, we have been continuing with the replacement of rotten lintels on the inside of the mill. These are now complete, leaving the outermost member of each lintel to be dealt with in the future, pending scaffolding.

Recently, we have turned our attention to exterior masonry. Where to begin?! The original lime mortar, in places, has crumbled quite badly. This appears to have been repointed on at least three occasions. Once, and presumably some time ago, with lime mortar of a more coarse texture. Secondly, with a brown/grey cement, and lastly with an almost black cement. The latter is most prevalent around the base of the tower, seemingly in an effort to weatherproof this region of damaged stone.


Showing original mortar and patches of flaky grey/brown cement, covered with lichen

Unfortunately, cement does not breathe as lime mortar does, and so any water which gets in, tends to be trapped. This is quite clear when chasing out the cement: it is covered with lichen and the original mortar behind it is dark in colour, crumbly and damp, with centipedes, woodlice and even worms living in the cracks. Ironically, the original, un-repointed lime is in a much better state, with no lichen or beasties.

The effect of trapped moisture is also shown by frost damage to much of the stone which had been smeared over with cement.

So begins a labour of love...chasing out the cement and loose mortar, before repointing with lime and, where necessary, filling in stone where the frost damage is at its worst. Give us a day or two (cough!....)


After chasing out, the stonework is more defined.