Thanks to all those who visited the mill on Saturday 14th May 2016, we hope you found it interesting. Luckily, there was just enough wind to power the sails for a short while.
Monday, 16 May 2016

Tuesday, 26 April 2016
Friday, 27 June 2014

.jpg)
Sails and fantail fitted at last, Wednesday 25th June 2014
After a bit of a wait for the ground to dry out again after a wet spell, we were ready to fit the fantail and sails.
The wind was initially a bit fresh, which made fitting the fantail slightly interesting (a large surface area to volume ratio=not very stable dangling off a cable). With another guide rope attached, however, the shaft was soon guided into its waiting bearings, and the bearing caps were swiftly fitted thereafter! At this stage the fan was left tied off, as we wanted to turn the cap manually. (The next day we tested it properly and it turned the cap from 90 degrees out of the wind, into wind with no problems.)
So, next came the sails. The first sail was lifted onto its stock and bolted/clamped into place. The 'empty' bit of stock was then lowered through the canister (the metal box at the end of the windshaft); thankfully it fitted. The second sail was then lifted and bolted/clamped to the stock. This was probably the most time consuming part of the day, as the two bolt holes could not be brought into alignment. It became evident that the sail needed trimming slightly to fit alongside the canister. This sorted the problem, and a bit of persuasion soon had the sail fixed in place.
After a bit of struggle getting the sails turned 90 degrees using the crane and a bit of leg power inside the cap (think hamster wheel), the process was repeated for the second pair of sails. These went on much more quickly (maybe we were getting the hang of it by now).
8 hours condensed into a few paragraphs!
We were back the next day to tidy up the wedging which locks the sails into place and to test the fantail. Longer term, the sails will be fitted with canvas, then we'll really see how she fares. All being well, the mill is capable of producing flour, but it is a very old machine, so we'll have to build up to that gradually. No doubt there'll be plenty of adjustments to be made along the way.
 |
| Just about to lift the fantail |
 |
| A perfect fit |
 |
| Fantail installed, now for the sails. (The paragliding enthusiast in me was trying to ignore the epic-looking sky at this point!) |
 |
| Lifting the first sail onto the stock |
 |
| Swinging the first sail over to the stock |
 |
| Lining up the sail and stock |
 |
| Almost there |
 |
| Bolting the sail to the stock and getting ready to fit the clamps |
 |
| First sail and stock dropped into the canister, now lifting the second sail for fixing to the stock |
 |
| Repeat for the second pair of sails, and there you have it |
 |
| Not a bad way to end the day |
Tuesday, 20 May 2014
Even closer to sails going on...
Another step forward today; moving the stocks and sails from storage over to the mill. Actual fitting should be soon...


Wednesday, 7 May 2014
Tuesday, 8 April 2014
Sailing along, part 2
So, more progress with the sails. All four were finished a while ago - we then moved onto making the stocks. These are the large timbers which fit into the end of the windshaft, and onto which the sails are fixed. Here's one being cut to size with our new saw - nothing subtle about working with sail timbers....

After all the sail timbers were finished, they were sent away for pressure treating with preservative. We then waited for a while (whilst working on another project) for the timbers to dry, to help with paint adhesion.
In the meantime, we laid the whips onto the stocks temporarily, to drill through both for the bolt fixings. We figured this would be a lot easier on the ground than half way up a mill in a hoist. It was still a hassle though, much thanks to our helpful farmers for the moving machinery.


After all the sail timbers were finished, they were sent away for pressure treating with preservative. We then waited for a while (whilst working on another project) for the timbers to dry, to help with paint adhesion.
In the meantime, we laid the whips onto the stocks temporarily, to drill through both for the bolt fixings. We figured this would be a lot easier on the ground than half way up a mill in a hoist. It was still a hassle though, much thanks to our helpful farmers for the moving machinery.
 |
| Positioning one of the whips for drilling |
More recently, we have moved onto painting the sails. Very smart they look too. Shouldn't be too long now before putting them up. Watch this space.
Friday, 13 December 2013
Sailing along
We are now well into making the first sail for the mill. First came planing and dimensioning of the smaller timbers, for the sail bars etc. Then came the not insignificant task of getting the 30 foot plus main timber (or 'whip') into the workshop. Copying the remains of an original, it was dimensioned and tapered, reading for chopping out the mortices for the 24 sail bars. These were all at different offsets and angles, to give the sail its 'spooned' shape, which helps catch the wind.
Here is the whip with the sail bars fitted.

Here is the whip with the sail bars fitted.
After this, the lead boards (visible on the right hand side) were fitted. These smooth the airflow onto the canvas (when it's fitted).
Next job will be the long members which run at ninety degrees to the sail bars (uplong and hemlath). Unlike the whip, these will be made of several lengths spliced together (one piece is visible lying on top of the sail, on the left side).
Meanwhile, we have made some minor modifications to the outside of the mill itself. We have noticed that, in driving rain, some water has been getting in just above the lintels, mainly at the upper windows. It is a weakness with timber lintels against stonework; as the timber dries and moves, a slight gap inevitably forms. There was no evidence of any hoods having been fitted to these windows originally, but we have decided to fit small strips, with lead flashing, to help prevent this water ingress. It changes the aesthetics of the tower only slightly and, more importantly, it should help prolong the life of the mill. Any water entering here could affect the new spliced beam ends which were fitted at the start of the project (perhaps the originals were so rotten, at least in part, due to a lack of protection over the lintels). The usual problem; where do you restore faithfully, where do you improve, where do you renew. It isn't easy, but we try our best......
Thursday, 24 October 2013
A long overdue update
Hello again. Well, lifting the cap onto the mill already seems like a long time ago and the summer has been well spent. Work-wise, we were away for a while, painting the sails of Danzey Green windmill, at Avoncroft Museum, Bromsgrove. Back at Great Haseley, we have spent some time setting up the drive gear from the fantail, so that the cap will turn into wind. A few teething problems, mainly due to lack of space, but we are getting there. Also, we have made lots of progress building the brake wheel. This is the large gear which is fixed to the windshaft, and has a brake around its outside rim, hence the name.

Here, the segments of the brake wheel have been cut and joined together.


Here, the segments of the brake wheel have been cut and joined together.

The next step was to mark out the 90 mortices, into which we would fit the cogs. These were very deep mortices, tapering and at a slight angle. Not easy.

Here we are with the cogs driven in, and by now the segments of the wheel have been bolted together.

Next, the 'clasp arms' were fitted, four on each face of the wheel. These will box around a square portion of the windshaft, so that the brake wheel can be wedged solidly into place. In essence, the whole drive for the stones come from this interface, so it has to be strong and accurate. In this image, the four arms on the underside have already been fitted, and two on the upper face are in position. These two were the only salvageable originals, and even they are a bit wormy - we shall see!....
Once complete, there was just the trivial task of taking it all to bits again, taking the pieces to the mill and rebuilding it in position around the windshaft. Unfortunately levitation is not one of our skills, so the last step was a bit awkward.

Clasp arms wedged into place

and the wheel built around them.
It will take some time to fine tune the position of the brake wheel on the windshaft, and the position of the wallower (the horizontal gear with which it meshes). It also looks like the brake wheel cogs will have to be shaped slightly, to get a perfect mesh. So, we are getting there, but slowly.
PS. Other news; we have just taken delivery of timber for the sails. So that'll be more morticing then.......
Wednesday, 17 July 2013
To cap it all off
Thanks to all those who came and watched, hope you enjoyed it! For those that missed the day, here are some pictures......
So, the first job was to lift off the temporary roof. Quite a strange experience when viewed from inside the cap!
 |
| Hooking up the temporary roof |
 |
| There goes the roof |
There followed some hurried removal of the plywood and wire mesh which had been fitted around the outside of the curb to keep out birds. During this period the restored wallower was hoisted up and onto the main shaft. No photos of the hoisting as I was busy (see above), but here is the wallower on the ground.

Next, the bearing circle was lifted. We had bolted on some bracing scaffold planks to try and keep the shape circular, which more or less worked.

A brief pause on crane work, while we fitted the remaining trolley wheels to the bearing circle (some had been left out to reduce the weight, and hence potential for distortion). All seemed well, with the wheels positioned right over the metal track of the curb - never in doubt!
That left one final object to lift, the cap.
 |
| Take the strain. You never really know if all your lifting points are strong enough until.... |
 |
| Making light work of 7.5 tonnes |


Finally, with some relief, the bearing at the centre of the cap frame slides perfectly onto the top of the main shaft, the skirt boards fit around the top of the tower and the cap circle sits on top of the trolley wheels. We have done it.

Wednesday, 3 July 2013
Pawn to King4
Since the last blog entry, things have moved on quickly. The cap has been covered with canvas, and given three coats of bituminous paint. We have also been able to fit the finial to the top of the cap, for that finishing touch! Garry Kasparov would have been proud.
The beady-eyed amongst you will have spotted the heavy brackets at the front of the cap. These are for the lifting straps when we crane the cap onto the tower, in the not too distant future. We are aiming for 16th July, but obviously this depends heavily on the weather.
 |
| The painted cap, with finial proudly atop |
 |
| Pawn to k4 |
The beady-eyed amongst you will have spotted the heavy brackets at the front of the cap. These are for the lifting straps when we crane the cap onto the tower, in the not too distant future. We are aiming for 16th July, but obviously this depends heavily on the weather.
Wednesday, 26 June 2013
The dalek gets an eye and some canvas
 |
| Gently does it |
We have also been making the most of the settled weather, covering the cap with canvas. The triangular pieces, or 'gores', are glued and nailed into place. At least there's no pattern to match up at the edges! The canvas will then be sealed and painted black. The white/cream colour does look good, but the original cap was black, and white hurts our eyes too much when working in bright light!
 |
| Some canvas gores applied |
The devil is in the detail, more specifically, weatherproofing detail. There is a bit of fiddly leadwork to be done, mainly around the front of the cap (vulnerable because, in theory, it will always be facing into the weather). We have also tried to improve a little on the storm hatch design, with a belt and braces approach to keeping out the rain. We have seen the damage water ingress here can do to a mill.
 |
| Leadwork on the weather beam, and a fine-looking storm hatch |
If the good weather continues, we should be looking at craning the cap on some time early July. Watch this space......
Tuesday, 11 June 2013
Cap looking good
Finally, the cap boarding has been finished.
Just over half was covered with boards reclaimed from the old cap, with the remainder being fitted with new timber. The ogee shape can now be properly seen, and many of the passers-by seem to appreciate it!
The 'skirt' boards have also been fitted around the base of the cap - easier now than when the cap is lifted onto the tower. Their style has been based on what we believe the originals looked like.
It looks like the final covering of the cap will be along more traditional lines; painted canvas, rather than the aluminium sheet which was used for previous repairs in the 70s. Not quite as maintenance free as lead, but just a little bit cheaper!
 |
| Planing the joints between boards |
Just over half was covered with boards reclaimed from the old cap, with the remainder being fitted with new timber. The ogee shape can now be properly seen, and many of the passers-by seem to appreciate it!
 |
| The final cap shape |
It looks like the final covering of the cap will be along more traditional lines; painted canvas, rather than the aluminium sheet which was used for previous repairs in the 70s. Not quite as maintenance free as lead, but just a little bit cheaper!
Friday, 10 May 2013
National Mills Weekend 11th-12th May - Mill Open on Sunday!
Although not yet normally open to the public, Great Haseley windmill will be open on Sunday 12th May, from 11am until 5pm. So come along for a rare chance to look around the mill and see the progress made with the restoration. There will be someone around from the restoration team, to answer any questions you may have.
Access is from Great Haseley, with a public footpath leading from Back Way right to the mill.
Click the link below for the National Mills Weekend website - with links to other mills open in your area....
http://www.nationalmillsweekend.co.uk/pages_wind/haseley.html
Access is from Great Haseley, with a public footpath leading from Back Way right to the mill.
Click the link below for the National Mills Weekend website - with links to other mills open in your area....
http://www.nationalmillsweekend.co.uk/pages_wind/haseley.html
Wednesday, 8 May 2013
Stoop and build 'em up
So, the next stage is upon us; relocating the cap to the mill and rebuilding there, in preparation for hoisting onto the tower. Luckily, the weather has been fine and we have made lots of progress in the last couple of weeks.
Next we raised the lower finial section with a tripod - ready to receive the cap ribs...
After that, with the storm hatch and fan door areas reassembled, we began boarding out the cap. Some of the boards were salvaged from the previous cap, probably enough to cover about one half. We will use new douglas fir boards to complete.

 |
| The main cap frame timbers arrive! |
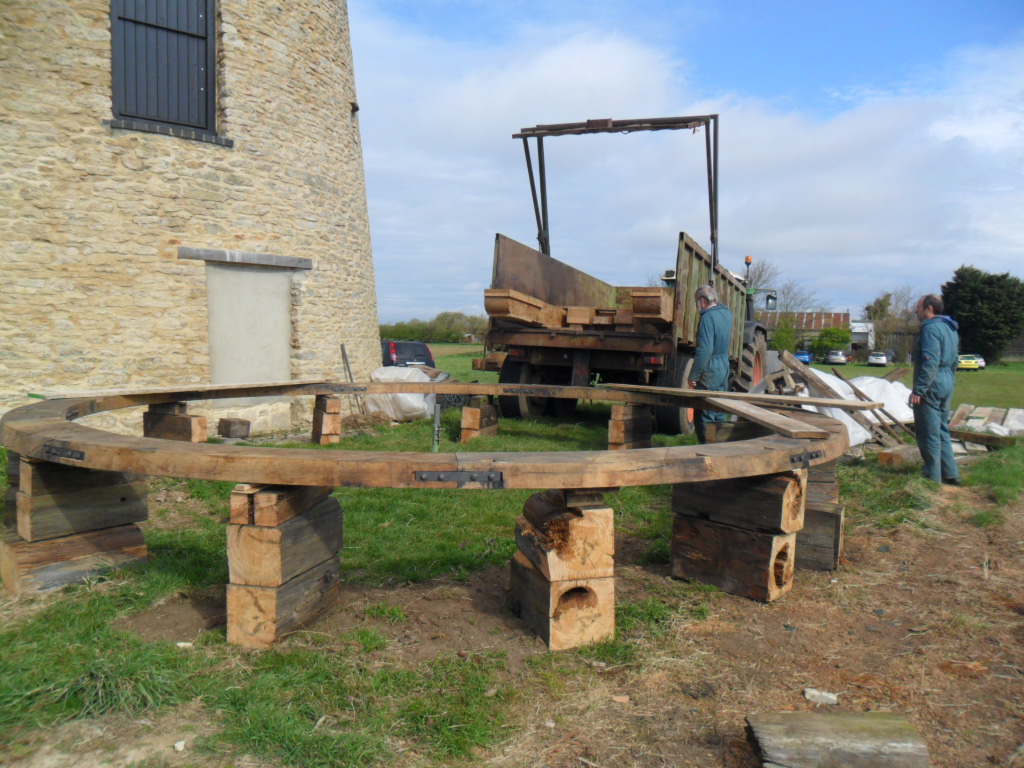 |
| The cap circle already laid out on blocks (the blocks were made from the old sail stock - you can see how badly decayed it was down the middle) |
 |
| The shears offloaded |
 |
| The frame and fan booms assembled |
Next we raised the lower finial section with a tripod - ready to receive the cap ribs...
 |
| Hoisting the finial |
 |
| First ribs going in |
 |
| The more you add, the stronger it gets! |
 |
| Errr, how do I get down |
 |
| With all the ribs fitted, and the ring purlin attached. Very aesthetically pleasing. |

Subscribe to:
Posts (Atom)